Friday, September 14, 2012

Nana's Swedish Meatballs

Good evening! Tonight's recipe comes from my grandmother's kitchen!
This is my lovely grandmother!  
This is one of my favorite recipes! It comes together quickly, and it tastes delicious! It tastes good with potatoes, with noodles, with corn, or whatever you want... the gravy is the perfect topper for pretty much any side dish.


The following recipe is based off of 1 lb of ground beef. We doubled it because we love leftovers, which made about 30 meatballs. It's your call as to the proportions!

Ingredients:
Meatballs:

  • 1 lb ground beef
  • 1 teaspoon salt
  • 1 teaspoon sugar
  • 1 teaspoon grated onion 
  • 1/2 cup plain bread crumbs


Gravy:
  • 2 tablespoonsful flour
  • 1 teaspoon salt
  • 1/8 teaspoon pepper
  • 2 cups milk
  • Gravy master (we find this in our supermarket near the spice aisle, where they usually also have the gravy packets!)

Directions:
Mix all of the meatball ingredients thoroughly. 

I decided to be lazy chef tonight and try it in the kitchen aid mixer with the paddle attachment. Now if only it would shape them into balls too! (First world cooking problems?)
Then, shape them into meatballs.

Melt butter in a frying pan on medium-high, and then fry the meatballs.
Remove them when all sides are browned and set them aside.

In the same pan that you browned the meatballs in, mix together the flour, salt, pepper, and milk. Whisk well to avoid flour lumps. 

Cook over medium heat until bubbles.
Add gravy master to thicken and darken, as desired. Mix thoroughly.


Add the meatballs back to the gravy and bring to a simmer to thicken. Cook until warmed through!


Enjoy!
P.S. This meal seriously needs crusty bread. I know I often recommend this, but it tastes great when sopping up gravy from your plate! YUM! :)

Tuesday, September 11, 2012

Slow Cooker Ribs

I love slow-cookers.
I love that I could prepare this dinner at 11 in the morning, and that I had a delicious dinner waiting for me when I got home from work tonight.

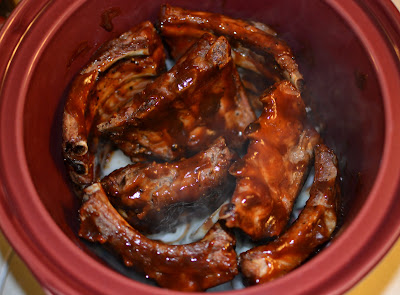
Look at them. All cozy in there :)
 Ingredients:

  • 3 lb baby back ribs
  • Salt and Pepper
  • 1-2 yellow onions
  • BBQ Sauce
It is at this point that I would like to add that you can use any BBQ sauce you want, or you can make your own. I have historically not been a fan of sauces that are too ketchup-y or molasses-y. I like a sauce that is more smokey, and so I used Bull's-Eye Hickory Smoke BBQ Sauce.
The smokey flavor was not too sweet, but delicious!

Directions:
First thing you need to do is admire your beautiful ribs.
YUM. Yumyumyumyum.
Then you need to take off the gross membrane from the bottom side. This is the stuff that gets stuck in your teeth when you eat ribs! It peels off pretty easily, you just have to get the tip of your knife under the membrane, and then it should just peel right off! (Grab it with a paper towel for a better grip!)
I should note that this hand is not mine. I do not have man-hands. :)

Then, cut the ribs into 3-4 rib sections. Pat them nice and dry, season with salt and pepper, and place on a broiling pan (or a cooling rack on a baking sheet).

Put under a broiler for about 15-20 minutes on each side, until they start to brown up a little.

While the ribs are broiling (and your house begins to smell DELISH!), slice up an onion or two into rings. Put these along the bottom of your slow cooker as a soft comfy bed for your ribs to go on!

When the ribs are done broiling, baste them with BBQ sauce, make sure they get covered, and throw them in the slow cooker. Then go ahead and throw some more sauce on to make sure they are EXTRA covered!

Cook in the slow cooker on high for an hour, then set it to low until they are done (typically anywhere from 8-10 hours total cooking time).
See-you can even SEE how good it smelled!
These ribs came out delightful, literally sliding off the bone! And because there was no membrane, they were not stringy at all. Instead, they fell apart into a plate full of deliciousness!

Served with french fries, corn, or whatever other sides you like!
Importantly, tonight this was served with a Shipyard Pumpkinhead Beer.


I love fall. :)

Friday, August 3, 2012

Soft Pretzels

Last night I attempted my first KitchenAid yeast experiment: Pretzels!


Look at them all. Just look at them! YUM!
Yeast always intimidated me. I feel like I never let it rise long enough, or knead well enough. So I was hoping my friend the dough hook would help me be successful!


The following recipe (from Get Off Your Butt and Bake!) is for use with a stand mixer, but you can swap it out for just mixing and hand kneading, especially if you have more kneading confidence than I!


Ingredients:

  • 1 and 1/8 cups water (70-80 degrees F)
  • 3 cups all-purpose flour (plus extra to add as you go!)
  • 3 tablespoonsful brown sugar
  • 1 and 1/2 teaspoonsful active dry yeast (1 packet)
  • 1/2 teaspoon salt
  • 2 quarts water (8 cups for those who don't want to do the conversion)
  • 1/2 cup baking soda
  • Coarse salt 
  • Egg wash (1 egg plus 1 tablespoon water)
  • Optional: melted butter
Directions:
Add warm water and brown sugar in the mixer bowl. Dissolve the sugar quickly (so the water doesn't cool off), and then add the dry yeast.
Let the yeast mixture rest for 2 to 3 minutes. You should see it foam!

That is how you know the yeast is alive and kicking! It's also really cool!
Add 1 cup of the flour with 1/2 teaspoon of salt. Mix well with the dough hook.
Add the remaining 2 cups of flour and continue kneading with dough hook (speed 2 on the mixer) for 5 to 6 minutes. When it is ready, the dough will be elastic and smooth, and shouldn't be really stuck to the bowl. Add additional flour or warm water if needed to help this along. (I probably added another 3 tablespoons of flour!)

Once the dough is done, let it rest in an oiled bowl for about 10 minutes. Cover the bowl with a warm damp cloth.

While the dough is resting, add the baking soda to the water and get it ready to boil.

Divide the dough into eight balls. I added a little extra flour around the balls, and stuck each one in a ziplock bag. You can also use saran wrap if you want! 

Whatever you use, let the dough sit for another 3 to 5 minutes.
Flour your working surface, and roll each ball into a 20 inch rope. Then have fun and make whatever shapes you want! Or little pretzel nuggets work too.

Drop pretzels into boiling water, one or two at a time (I did one at a time because I was nervous). Boil for about 10-15 seconds (10 for the nuggets). Remove with a slotted spoon and drain on paper towels.

Place pretzels on greased baking sheets, or if you have a pizza stone, use that! The pizza stone made our pretzels nice and crunchy on the outside!

The next step is where you're supposed to brush the pretzel with the egg wash and then sprinkle with coarse salt. It was about 11pm when I was making these, and accidentally brushed it with the melted butter. Still came out good - but try the egg wash!
Bake at 425 degrees for 10 minutes or until brown. If you want, here is where you can brush with melted butter.

Let them cool (but not too much - because warm pretzels are just the best!) I like my pretzels dipped in mustard, but do whatever you like! Have fun!

Delightful midnight snack!


Tuesday, July 31, 2012

Chocolate Chocolate Cupcakes

Hello! Quick little post tonight - little KitchenAid mixer experiment!
After working every day/night since getting my new mixer, I finally got a chance to play with it tonight!
Found an interesting chocolate cupcake recipe online, and decided to be daring and give it a shot. (Also easily made vegan if that floats your boat! My boat however floats on different waters!)


Just the one picture, because I wasn't expecting to post this... but once they were made, I just HAD to share! Enjoy!


(Adapted from Food.com)
Ingredients:

  • 1 and 1/2 cups flour
  • 1 cup granulated sugar
  • 1 teaspoon baking soda
  • 1 teaspoon salt
  • 1/3 cup cocoa powder (I used Shaws brand. Good, but I should really invest in some of the good stuff. Godiva maybe!)
  • 1/2 cup vegetable oil
  • 1 cup milk (The original recipe called for water. If you want to keep it vegan, go ahead and use water, should turn out just as fine! The milk just made it a little richer)
  • 1 teaspoon vanilla extract 
  • 1 teaspoon white vinegar
NO EGGS. Weird right? Almost scared me off, but I am glad I made it!

Directions:
  • Preheat oven to 350 degrees
  • Mix all ingredients together until moist / well blended (This is where my mixer made life sooooooooooo easy!)
  • Put in paper cupcake liners and bake for 20-25 minutes
  • Frost with whatever you deem to be best!
I found a yummy frosting recipe on Food Network. I thinned it out with a little extra cream and a tablespoonful of warm water. Added some chocolate jimmies, and there you have it!

Wednesday, July 25, 2012

Grilled Marinated Flank Steak

Hello and welcome back! 
My deepest apologies for not posting since April. A number of factors led to me really not cooking very much. This all culminated in me eating a whole bunch of terrible food, and not having anything of substance to post. 
However, stress level is significantly lower, so culinary adventures have resumed!
Tonight's specialty is some grilled, marinated flank steak.


Couldn't come up with a more creative name for this... Sorry folks, but sometimes it is what it is, and this time, it is just delicious.

And how easy! I stuck this in the marinade last night, let it hang out overnight, and slapped it on the grill tonight! Served it with a baked potato and some corn on the cob. Love summer food!


Enjoy!


(Adapted from Simply Recipes)
Ingredients:
Look at that adorable honey bear. SO CUTE.

  • 2 lb flank steak
  • 1/3 cup olive oil
  • 4 cloves of garlic (or 2 cloves of elephant garlic! Yup. It's real.) crushed/minced
  • 2 tablespoonsful red wine vinegar
  • 1/3 cup soy sauce (I opted for low sodium. I didn't want to overpower the steak with saltiness, plus, healthier!)
  • 1/4 cup honey (I got the kind that is in a bear shape. Because it was TOO ADORABLE to pass up!)
  • 1/2 teaspoonful ground black pepper
Directions:
  • Score the flank steak with cuts about 1/4 inch thick
Hard to see, but I did it crisscross. You can choose to just do it one way if you'd like.
  • Combine all the ingredients (mix well!)
I wish I had 10 whisks like this. Love it!
  • Trim the steak if you need to. Mine was really fatty
  • Put the steak in the marinade either in a container or a freezer bag to marinate. I did it overnight, but if you're not going to do that, do it for at least 2 hours. The longer, the juicier!

  • Grill! Use high heat. We cooked it sort of indirectly, on the cooler spot of the grill, because we were a little nervous the honey would burn. Cook it until it is the level of done-ness that you prefer!

  • Let it rest for a few minutes before slicing, and make sure you slice on the diagonal.
Enjoy!


P.S. Kitchenaid mixed due in the mail in a few days. There will be LOTS of baking ahead! Also, I do take requests/suggestions!

Sunday, April 15, 2012

Roasted Lamb Dinner

Happy Easter, blog readers!
If you're confused and think that Easter was LAST week, you are both right and wrong! Today is the Greek Orthodox Easter (Καλό πάσχα, Χριστός ανέστη! (Happy Easter, Christ is risen!)). To celebrate, we made traditional Easter lamb... And I can't tell ewe how how great it turned out!


I'm not pulling the wool over your eyes folks! But to be sure, you'll have to try it yourself!


Ingredients:

  • Boneless butterflied leg of lamb (Ours was about 4 pounds. If you eat like us, this will MAYBE feed 3 people :) But for normies, this will probably be enough for your whole family.)
  • Red wine (Everyone on Food Network says to cook with a wine that you would also drink. Little do they know, I'm willing to drink boxed wine. We used whatever we had, which turned out to be a good red!)
  • 4 lemons juiced (plus extra lemon wedges served with the meal)
  • Olive oil (an amount roughly equal to the lemon juice)
  • Garlic (4-5 cloves minced, and an additional 2 cloves cut into thin slices)
  • 1/2 teaspoonful freshly ground black pepper
  • 1 to 2 heaping tablespoons of oregano
  • 1 small to medium onion, grated (whatever you have is probably okay)
  • Potatoes (as many as you want, whatever type you want!)
  • Carrots
  • More onions for roasting
Directions:
IMPORTANT: Make the marinade the night beforehand. The longer this baaa-d boy marinates the better it is!
Prepare the marinade: 
Whisk together the olive oil and lemon juice before adding anything else.
Add the minced garlic, oregano, pepper, and grated onion.
Add a splash of red wine. Whisk until properly mixed.
(If this look familiar at all, reexamine the Chicken Souvlaki post from last summer!)


Prepare the lamb:
We like to trim excess fat off of the lamb. While some fat is okay and tastes good, too much can be hard to chew.
Pierce the lamb randomly all over with a pointy knife, and insert the very thin sliced garlic into the piercings. Marinate the meat overnight!


Dinnertime Preparation:
When it is time to start cooking, preheat the oven to 360 oF. 
Slice the potatoes and carrots into chunks, and boil for about 7 minutes. Slice onions into wedges.


Using a skillet, at high heat, sear the lamb for a few minutes on each side until caramelized.


Put the carrots, potatoes, and onions in the bottom of a roasting pan and drizzle with olive oil. You can go ahead and add some extra salt, pepper, and oregano if you want!
Lay the lamb on top of the vegetables, and sprinkle with salt. (use a roasting rack if you have one!)

Roast uncovered for about an hour and a half. We used the American Lamb Doneness Chart to determine how long to cook it. Cook less if you want it more on the medium-rare side!


After you take it out, squeeze fresh lemon juice over it, let sit for about 10 minutes before you cut into it. 


I literally can't express how good our kitchen smelled, and how impatient I was during those 10 minutes.  WORTH THE WAIT! We also served it with imported Greek feta cheese and olives!


Anyways, that's our lamb dinner! If you celebrate Easter, then I hope you had a wonderful holiday and were lucky enough to spend it with people who you care about.
If you don't celebrate Easter, this is a good recipe anyways to have anytime you have time to make it! 

And as always, enjoy!

Monday, March 26, 2012

Mom's Lasagna!

Hello, readers! Tonight's dinner is a classic - homemade lasagna!

This recipe comes from my mother, and is always good! (But especially good on freakish nights where it gets cold again. Not happy about that!!)

I'm not going to lie about this one - not as simple as the others, mainly because it has homemade sauce. But it does freeze great, so you may as well make two while you're at it and throw one in the freezer!!

Ingredients:
  • 1 onion
  • 1 green pepper
  • Mushrooms (as many as you want! I used half of a package for 1 lasagna)
  • 6oz can tomato paste
  • 29 oz can tomato puree 
  • Salt, pepper, garlic powder, basil, and oregano (to taste)
  • 1 lb ground beef
  • Lasagna noodles (1 lb if normal noodles, 1 box if no-boil noodles. YES it is a thing!)
  • 1 lb ricotta cheese
  • 1 egg
  • 1 lb shredded mozzarella cheese
  • Romano cheese
Directions:
Make the sauce:
Dice the onion, green pepper, and mushrooms. Brown in olive oil.
Brown the ground beef.
Add tomato paste and tomato puree. Rinse out tomato paste can with water and add to the sauce until it is of desired thickness.
Add the spices to taste... I like adding a little more basil than I do oregano, and just a bit of the other spices. (I am aware at how vague that was, but it really is individual per your palate!)
Add the ground beef, and let the sauce simmer for at least 1 to 2 hours. 

Assemble the lasagna:
Preheat the oven to 375oF.
Mix the egg in with the ricotta.

Using a 9x13 dish (or a lasagna pan), layer sauce, noodles, ricotta, and mozzarella. 

Repeat layers until 3 layers of each. Sprinkle Romano on the top when done with layers.
Layer 1: Sauce (yumm!)

Layer 2: Noodles! These are the no-boil noodles

Layer 3: Ricotta cheese

Layer 4: Mozzarella

Cook uncovered for 30 minutes, and serve with extra sauce. (And crusty bread. As I have said many times here on the Fork and Dagger, EVERYTHING goes well with crusty bread!)


Enjoy! (And then, enjoy a second time around when you reheat your second lasagna. Go ahead, thank me later :) You'll be glad you made it!)